
Biscuev No-Bake Cheesecake

A silky, dreamy no-bake cheesecake layered with crunchy Biscoff crust and cookie-butter swirl — effortless to make and impossible to resist.
This Biscuev no-bake cheesecake arrived in my life on an ordinary weekend when I wanted dessert without turning on the oven. I had a jar of Biscoff spread in the pantry and a bag of spiced biscuits leftover from holiday baking; combining them felt like a small experiment. The result was a creamy, lightly spiced dessert that tastes indulgent but comes together with relaxed, confident technique. My children dubbed it the "cookie butter cloud," and soon it became the dessert I bring to gatherings when I want to make an impression with minimal fuss.
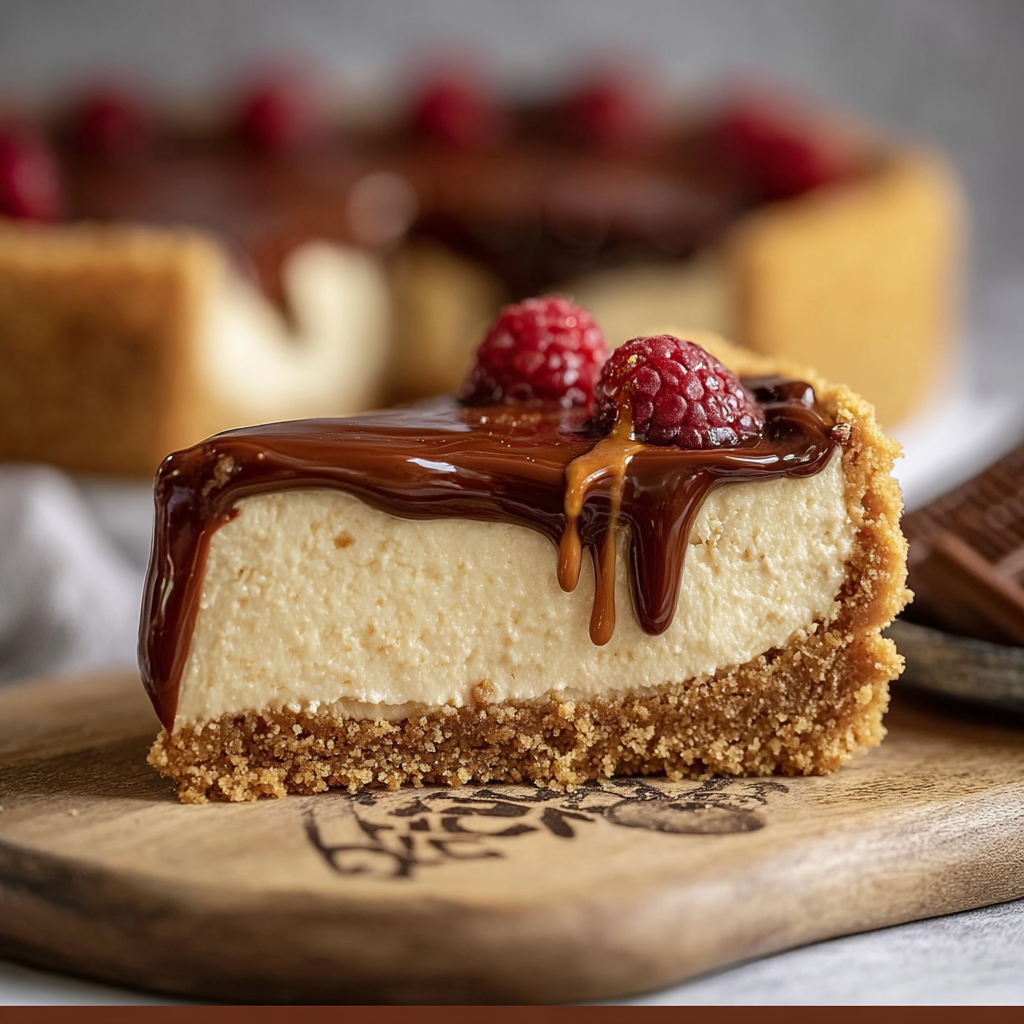
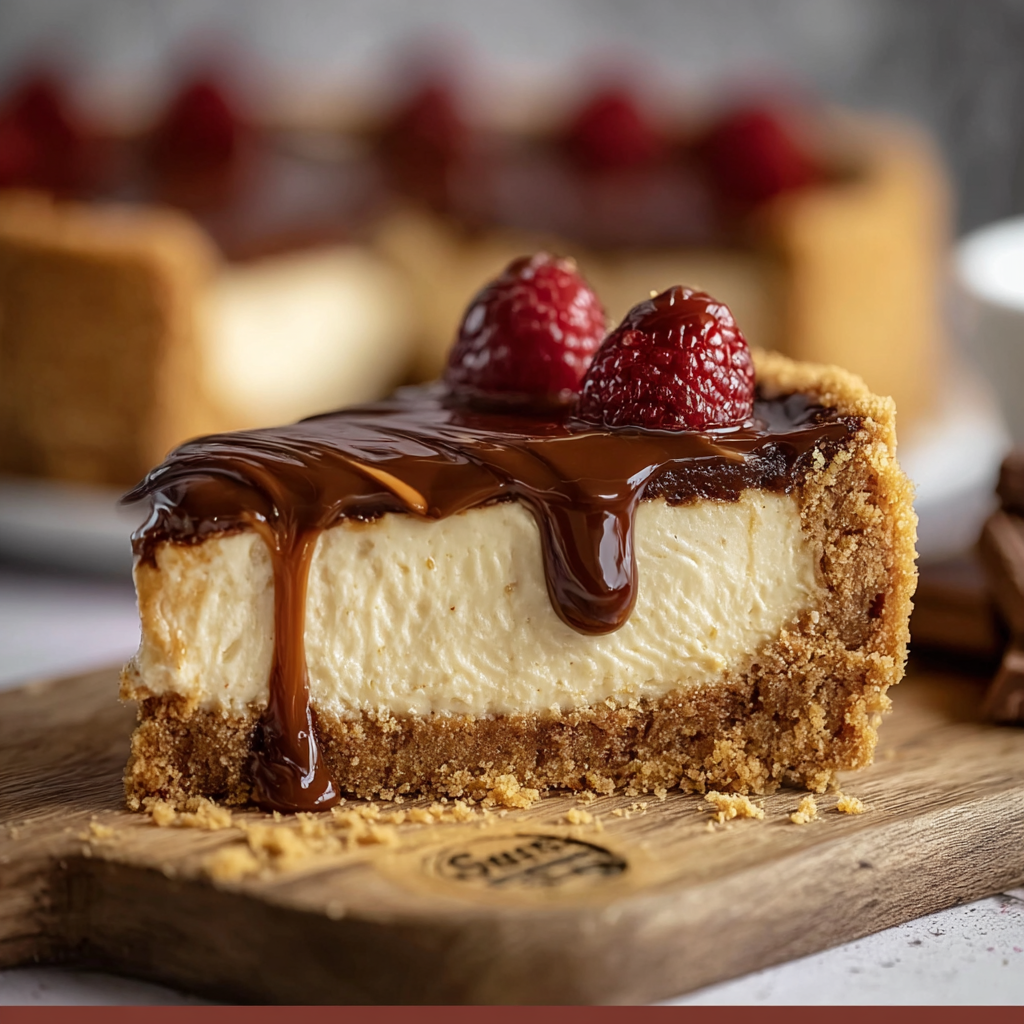
The texture here is everything: a crisp, buttery base made from crushed Biscoff biscuits, a rich yet airy filling of whipped cream folded into sweetened cream cheese and cookie butter, and a glossy finish of melted Biscoff on top. It’s balanced, not overly sweet, and has that warm caramelized spice from the biscuits that keeps people reaching for another slice. I discovered that chilling time is the real secret — patience rewards you with clean slices and a set, luxurious mouthfeel. This recipe is forgiving, approachable for weeknight bakers, and crowd-pleasing for parties or quiet nights in.
Why You'll Love This Recipe
- Ready with about 20 minutes of active work and then chilling time, it’s perfect when you want an impressive dessert without hours in the kitchen.
- Uses pantry-friendly ingredients: Biscoff biscuits and Biscoff spread carry the flavor, while cream cheese and heavy cream create classic cheesecake richness.
- Comes together with simple equipment — a 9-inch springform pan, a mixer, and mixing bowls — no oven required so it’s ideal in warm weather or small kitchens.
- Make-ahead friendly: it holds well in the refrigerator for up to 3 days and freezes beautifully for longer storage.
- Customizable: swap toppings, add a chocolate drizzle, or turn it into mini jars for portable servings.
When I first served this at a neighborhood potluck, friends asked for the recipe before dessert plates were cleared. The accessibility of the ingredients and the remarkably gourmet finish make it an easy win; even people who usually avoid desserts with spice fell in love with the caramel-ginger notes brought by the crushed biscuits.
Ingredients
- Crushed Biscoff biscuits (2 1/2 cups): Look for the original Lotus Biscoff cookies for that signature caramelized spice. Crush them finely in a food processor or place them in a zip-top bag and use a rolling pin. The fine crumbs pack well and create a crisp, cohesive foundation.
- Unsalted butter (1/2 cup, melted): Use high-quality butter such as Kerrygold or Plugrá for a clean, creamy flavor. Melt completely and cool slightly before mixing with crumbs so you don’t melt the filling later.
- Cream cheese (16 ounces, softened): Full-fat cream cheese yields the creamiest texture. Let it sit at room temperature for 30 minutes so it blends smoothly without lumps; I prefer Philadelphia for consistent results.
- Powdered sugar (1/2 cup): Provides even sweetness and helps stabilize the filling. Sift if you notice any clumps.
- Biscoff spread (1/2 cup + 1/4 cup for topping): Also labeled cookie butter; warm slightly if too firm so it blends into the filling. The spread is the star flavor so choose a brand you enjoy.
- Vanilla extract (1 teaspoon): Pure vanilla adds warmth and rounds the flavors; a small splash makes a big difference.
- Heavy cream (1 1/4 cups, whipped): Whip to soft peaks before folding into the cream cheese mixture for an airy, mousse-like structure. Chill the bowl and whisk for best whipping volume.
- Extra biscuits for garnish: Reserve a few whole or halved biscuits for decoration; they add textural contrast and visual appeal.
Instructions
Prepare the crust: Place 2 1/2 cups crushed Biscoff crumbs in a mixing bowl, pour in 1/2 cup melted unsalted butter, and stir until every crumb is moistened. Press the mixture firmly into the base of a 9-inch springform pan using the back of a measuring cup to achieve an even, compact layer. Chill in the refrigerator while you make the filling so it firms up and resists sogginess. Make the filling: In a large bowl, beat 16 ounces softened cream cheese with 1/2 cup powdered sugar until smooth and lump-free, scraping the bowl often. Add 1/2 cup Biscoff spread and 1 teaspoon vanilla; mix until evenly incorporated. In a separate chilled bowl, whip 1 1/4 cups heavy cream to soft peaks. Fold the whipped cream into the cream cheese mixture gently but thoroughly to preserve airiness — use a spatula and cut-and-fold motions for an even, airy texture. Assemble: Pour the filling over the chilled crust and smooth the top with an offset spatula. Tap the pan gently on the counter to settle the filling and release any trapped air pockets. Optional: dollop or swirl a few teaspoons of extra Biscoff spread across the surface and use a skewer to create decorative swirls without deflating the filling. Chill until set: Cover loosely with plastic wrap and refrigerate for at least 4 hours, preferably overnight. For quicker results, place the pan in the freezer for 1 1/2 to 2 hours, monitoring so it doesn’t freeze solid; this will firm the structure for cleaner slices. Finish and serve: Before serving, warm 1/4 cup Biscoff spread until pourable and drizzle over the top. Garnish with extra biscuits. Run a knife around the pan edge for a clean release and unclasp the springform. Slice with a hot, dry knife for tidy pieces.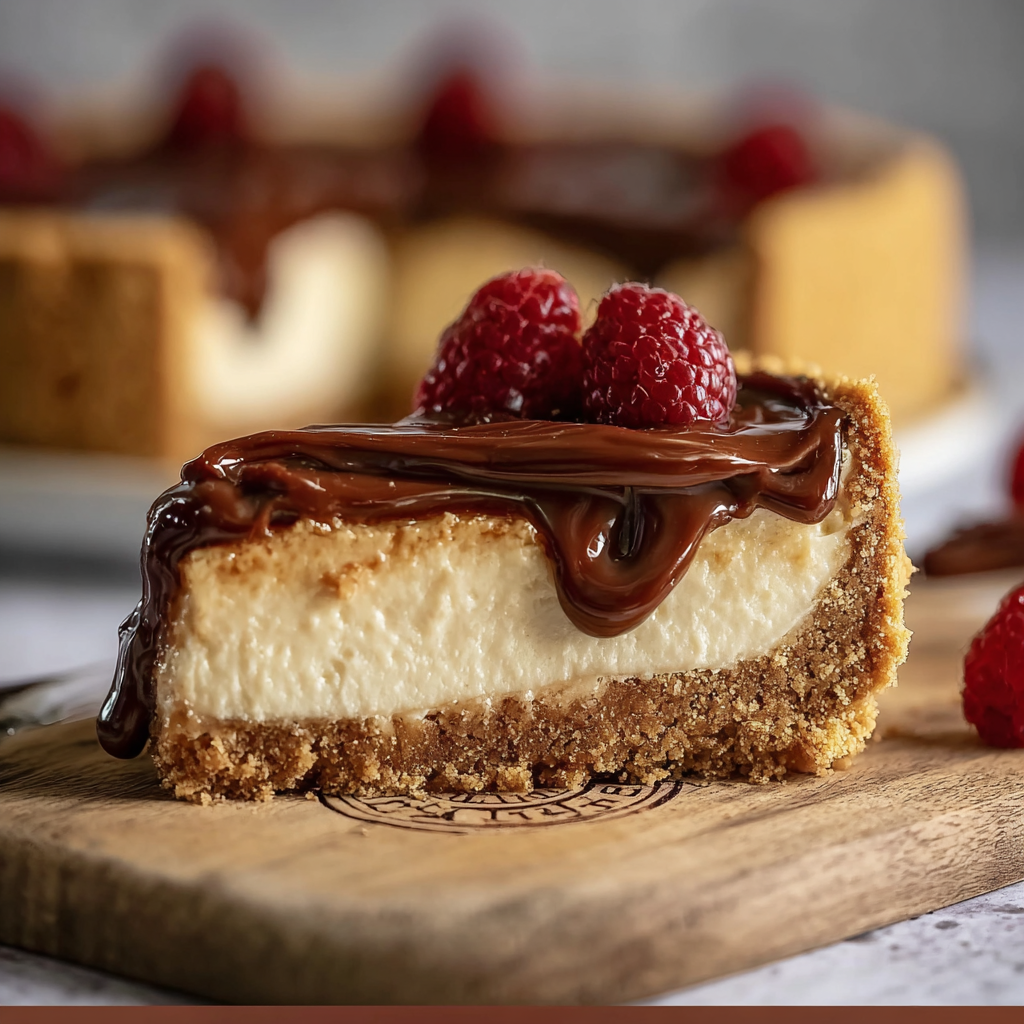
You Must Know
- Chilling is crucial: at least 4 hours in the refrigerator gives a silky texture; overnight is best for clean slices and full flavor development.
- Whip the cream to soft peaks and fold gently to retain air — overmixing will flatten the filling and make it dense rather than light.
- For a firmer crust, press crumbs tightly and chill before adding the filling so the butter solidifies and binds the crumbs.
- The dessert keeps well: refrigerated for up to 3 days or frozen for up to 3 months; thaw overnight in the refrigerator before serving.
My favorite part of making this is the immediate reaction from people who taste it: surprised by the depth of flavor from such simple steps. It’s a dessert that feels special without requiring show-stopping effort, and I love that it can be dressed up or simplified depending on the occasion.
Storage Tips
Store this dessert in the refrigerator, covered or in an airtight container, for up to three days to preserve texture and flavor. If you need longer storage, freeze whole or sliced portions wrapped tightly in plastic wrap and then foil; label with the date and use within three months. To thaw, transfer to the refrigerator overnight for even thawing. For reheating touches such as a softer topping drizzle, gently warm Biscoff spread in short 10-second bursts in the microwave and spoon over slices just before serving.
Ingredient Substitutions
If you can’t find Biscoff spread, try another speculoos cookie butter or blend graham crackers with a tablespoon of brown sugar and a pinch of cinnamon to mimic the warm notes. For a lighter version, substitute half the cream cheese with mascarpone for a silkier texture, or use a lighter whipped cream alternative, though this will slightly change mouthfeel. To make gluten-free, swap the biscuits for a certified gluten-free cookie with similar spice profile. Be mindful that any substitution may alter sweetness and texture so adjust sugar and chilling time slightly.
Serving Suggestions
Serve slices with a drizzle of warm caramel, a few toasted hazelnuts, or a dollop of lightly sweetened whipped cream. Pair with a robust black coffee or a milder tea to balance the sweetness. For gatherings, arrange slices on a large platter with extra biscuits for guests to nibble. Turn the dessert into an elegant plated course by adding a quenelle of crème fraîche and a scattering of toasted seeds or micro herbs for contrast.
Cultural Background
While this is a modern, pantry-driven creation, it draws inspiration from European speculoos biscuits that are traditionally enjoyed in Belgium and the Netherlands. The marriage of the spiced biscuit and rich, creamy base echoes classic no-bake desserts that evolved as home cooks started blending global flavors with familiar techniques. The cookie butter phenomenon rose to popularity because it captures the caramelized, spiced flavor of the biscuit in a spreadable form, making it easy to incorporate into contemporary desserts like this.
Seasonal Adaptations
For autumn or winter, fold a pinch of ground ginger or nutmeg into the filling to amplify seasonal spice notes. In spring and summer, top with fresh berries for brightness and a pop of acidity that contrasts the sweet, buttery base. At holiday gatherings, add a sprinkle of sea salt on the melted Biscoff finish or a scattering of toasted pecans to introduce textural contrast and festive visual appeal.
Meal Prep Tips
Prepare the crust and filling up to 48 hours ahead. Assemble, cover, and refrigerate until party time. For portable servings, portion into 4-ounce jars: press a thin layer of crust into each jar, spoon in filling, chill until set, and top with warmed Biscoff when serving. Use sturdy, reusable containers that fit in your refrigerator neatly, and label with date to track freshness.
This no-bake creation is a welcome go-to for busy hosts and quiet nights alike — easy to scale, reliably delicious, and full of warm, familiar flavor. Make it your own, and enjoy the small, joyful ritual of sharing a slice.
Pro Tips
Use room-temperature cream cheese to avoid lumps and achieve a smooth filling.
Chill your mixing bowl and whisk for easier whipping of heavy cream and better volume.
Press the crust firmly into the pan and chill before adding the filling to prevent a soggy base.
Warm Biscoff spread slightly to make drizzling easier and for a glossy finish.
This nourishing biscuev no-bake cheesecake recipe is sure to be a staple in your kitchen. Enjoy every moist, high protein slice — it is perfect for breakfast or as a wholesome snack any time.
FAQs about Recipes
How long should I chill the cheesecake?
Chill the dessert for at least 4 hours in the refrigerator; overnight yields the best texture and clean slices.
Can I freeze the cheesecake?
Yes — freeze whole or in slices wrapped tightly for up to 3 months. Thaw in the refrigerator overnight before serving.
Tags
Biscuev No-Bake Cheesecake
This Biscuev No-Bake Cheesecake recipe makes perfectly juicy, tender, and flavorful steak every time! Serve with potatoes and a side salad for an unforgettable dinner in under 30 minutes.
Ingredients
Crust
Filling
Topping
Instructions
Prepare the crust
Mix 2 1/2 cups crushed Biscoff crumbs with 1/2 cup melted butter until evenly moistened. Press into base of a 9-inch springform pan and chill while preparing the filling.
Make the filling
Beat 16 ounces softened cream cheese with 1/2 cup powdered sugar until smooth. Add 1/2 cup Biscoff spread and 1 teaspoon vanilla, mixing until combined. In a separate chilled bowl, whip 1 1/4 cups heavy cream to soft peaks and fold gently into the cream cheese mixture.
Assemble and chill
Pour the filling over the chilled crust, smooth the top, and optionally swirl a little extra Biscoff spread. Cover and refrigerate for at least 4 hours or overnight; freeze briefly for faster setting if needed.
Finish and serve
Warm 1/4 cup Biscoff spread until pourable and drizzle over the chilled cheesecake. Garnish with extra biscuits, run a knife around the pan, release the springform, and slice with a hot, dry knife.
Last Step: Please leave a rating and comment letting us know how you liked this recipe! This helps our business to thrive and continue providing free, high-quality recipes for you.
Nutrition
Did You Make This?
Leave a comment & rating below or tag
@royalrecipe on social media!
Categories:
You might also like...

5-Minute Air Fryer Roasted Garlic Magic That Wows
Learn how a 5-minute prep transforms a whole garlic bulb into silky, caramelized cloves in the air fryer. Perfect as a spread, mix-in, or flavor booster that elevates weeknight meals and party plates.

Air-Fried Pizza Rolls
Golden, melty pizza rolls made in the air fryer—crispy outside, gooey inside, ready in under 20 minutes. Perfect for snacks, parties, or quick dinners.

Air-Fried Rice Paper Noodle Rolls
Crispy, light rolls filled with vermicelli, tofu or shrimp, and crisp vegetables—air-fried for a healthier crunch and quick prep.
Did You Make This?
Leave a comment & rating below or tag @royalrecipe on social media!
Rate This Recipe
Share This Recipe
Enjoyed this recipe? Share it with friends and family, and don't forget to leave a review!
Comments (1)
This recipe looks amazing! Can't wait to try it.
Comments are stored locally in your browser. Server comments are displayed alongside your local comments.

Hi, I'm Riley!
What's Popular

30-Minute Meals!
Join to receive our email series which contains a round-up of some of our quick and easy family favorite recipes.