
Candy Cane Cookies

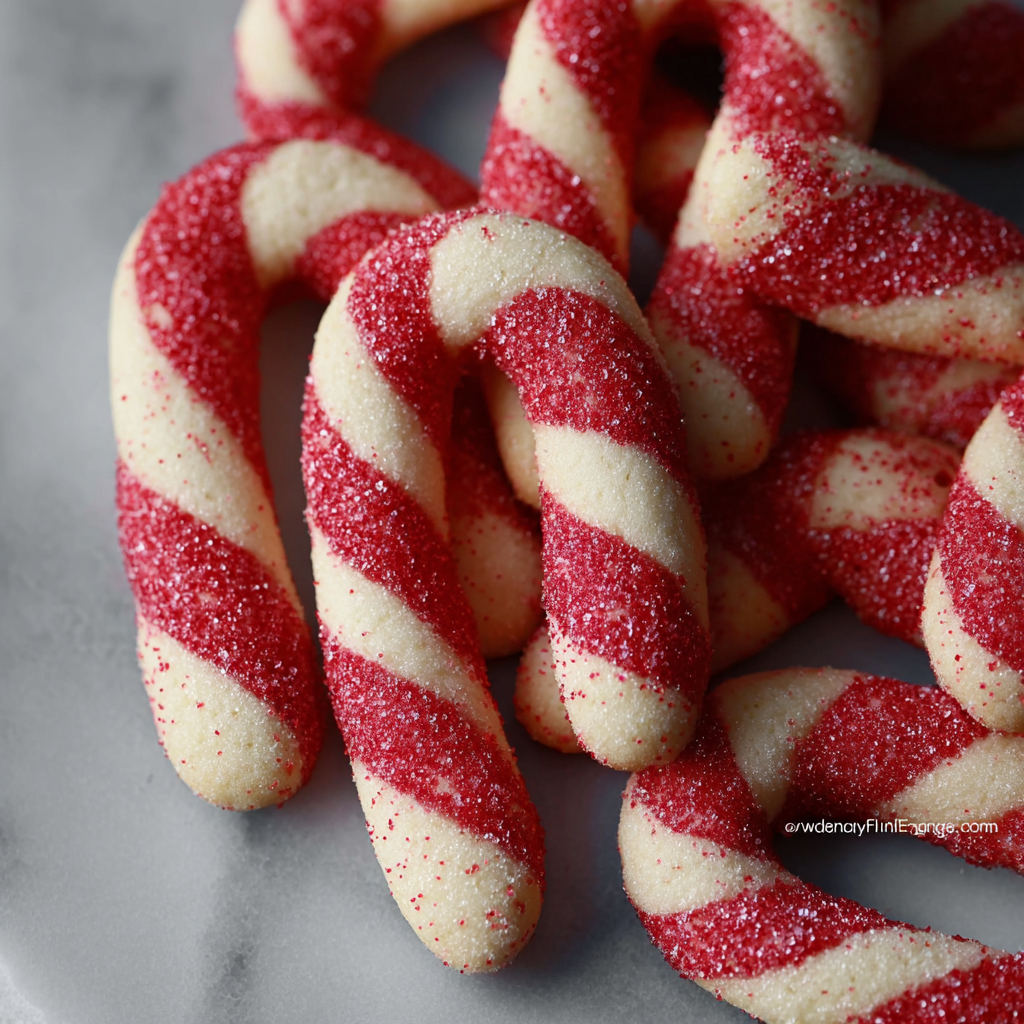
Buttery sugar cookies swirled with peppermint and festive red stripes, finished with crushed candy canes for a crunchy holiday bite.

This batch of candy cane cookies became my holiday signature the first year I hosted a December cookie swap. I wanted something that tasted like a classic sugar cookie but smelled like a winter peppermint shop, and that bright red swirl simply made everyone grin. The dough is tender and buttery, the peppermint extract gives a clean cooling note, and the crushed candy cane topping adds the perfect festive crunch. I discovered the technique for the red swirl while trying to make striped candy easier for kids to help decorate; now it’s a quick family tradition.
I remember making these while a holiday movie played in the background and my younger cousin insisted on adding extra candy cane bits — she declared them officially 'more magical.' These treats are forgiving, quick to prepare, and work well for assembly-line decorating with friends. Texture-wise they stay soft in the center with slightly crisp edges if you bake them just until the tops set. The peppermint and vanilla combine to create a clean, holiday-forward flavor that pairs beautifully with a cup of cocoa or a sharp cheddar cheese board for a playful contrast.
Why You'll Love This Recipe
- Buttery base with a tender crumb: the method creates cookies that are soft inside with gently crisped edges when baked at 350°F for 8–10 minutes.
- Quick to pull together: about 20 minutes of active prep, then chill — perfect for last-minute cookie swaps or holiday baking days.
- Kid-friendly decorating: the red gel striping and crushed candy cane topping make them fun for kids to help with and beautiful on a platter.
- Uses pantry staples plus a small holiday twist: most kitchens already have flour, sugar, butter, and egg — just add peppermint extract and a pack of candy canes.
- Make-ahead friendly: dough can be refrigerated up to 48 hours or frozen for longer storage; baked cookies freeze and thaw well.
- Customizable sweetness and crunch: finish with granulated sugar for a classic look or crushed candy canes for peppermint crunch.
When I first served these at a winter potluck, they vanished in minutes. Friends commented on the delicate peppermint lift and how the cookies didn't overwhelm with sweetness. Over the years I've learned small adjustments — like using gel food coloring for vivid color without extra liquid — that make the cookies both prettier and more consistent. It’s a small ritual now: I put on holiday music, let the dough chill, and invite whoever’s around to help roll and stripe the dough ropes.
Ingredients
- All-purpose flour (2 1/2 cups): Look for a reliable brand such as King Arthur or Pillsbury for consistent protein content and structure. Proper flour measurement is important — spoon into the cup and level off to avoid dense cookies.
- Baking powder (1/2 teaspoon): Provides a gentle lift so cookies stay tender; if your baking powder is older than 6 months, replace it for best rise.
- Salt (1/4 teaspoon): Balances sweetness and enhances butter flavor; use fine sea salt or kosher salt (adjust slightly if using coarse kosher).
- Unsalted butter (3/4 cup, softened): Use high-quality butter like Plugrá or Kerrygold for a richer flavor; bring to room temperature so it creams smoothly with sugar.
- Granulated sugar (3/4 cup): Provides structure and light crispness; for a more tender result, you can substitute half with light brown sugar but the flavor will be deeper.
- Large egg (1): At room temperature, it emulsifies the dough and adds richness; if using extra-large eggs, whisk and measure about 1/4 cup.
- Vanilla extract (1 teaspoon): Use a pure vanilla like Nielsen-Massey, which adds aromatic depth and balances the peppermint.
- Peppermint extract (1/2 teaspoon): A little goes a long way — McCormick or LorAnn brands are concentrated; start with 1/2 teaspoon and add more only if you want a stronger peppermint punch.
- Red gel food coloring: Gel provides vibrant color without altering the dough’s hydration; a tiny pea-sized amount is usually enough.
- Crushed candy canes or granulated sugar (optional): Adds festive crunch and sparkle; crush candy canes finely in a zip bag with a rolling pin for even topping.
Instructions
Prepare the dry ingredients: Whisk together 2 1/2 cups all-purpose flour, 1/2 teaspoon baking powder, and 1/4 teaspoon salt in a medium bowl. This ensures the leavening is evenly distributed and prevents pockets of baking powder that can create uneven rise. Cream butter and sugar: In a large bowl, beat 3/4 cup softened unsalted butter with 3/4 cup granulated sugar until light and fluffy, about 2–3 minutes with a hand mixer or 1–2 minutes in a stand mixer on medium speed. Proper creaming traps air that helps yield a tender texture. Add egg and extracts: Beat in 1 large room-temperature egg, 1 teaspoon vanilla extract, and 1/2 teaspoon peppermint extract until combined. Scrape the bowl to ensure even mixing; the dough should look glossy and slightly thickened. Create the dough and color stripe: Gradually fold the dry ingredients into the wet mixture until just combined — overmixing develops gluten and makes cookies tough. Remove about one quarter of the dough and tint that portion with a small amount of red gel food coloring until you reach a vivid red hue. Keep the rest uncolored for the candy-cane contrast. Shape and chill: On a sheet of plastic wrap or parchment, roll the uncolored dough into a log about 1-inch in diameter. Roll the red dough into a thinner rope and press it along the length of the uncolored log. Wrap tightly and chill for at least 30 minutes to firm up — chilling helps keep the shape while baking. Slicing and baking: Preheat the oven to 350°F. Slice the log into 1/4-inch rounds and place on parchment-lined baking sheets about 1 inch apart. Optionally sprinkle with crushed candy cane or granulated sugar. Bake for 8–10 minutes, or until the edges have set and the centers are just firm. Avoid overbaking to keep centers tender. Cool and finish: Let cookies cool on the pan for 3–4 minutes, then transfer to a wire rack to cool completely. If desired, press extra crushed candy cane onto warm cookies for added adhesion and crunch. Store cooled cookies in an airtight container at room temperature for up to 5 days.
You Must Know
- These cookies are high in carbohydrates and moderate in fat — perfect for holiday indulgence but not low-carb friendly.
- Dough can be refrigerated up to 48 hours or frozen for up to 3 months; slice frozen logs slightly thicker and add a minute to the bake time.
- Use gel food coloring to avoid adding liquid; a little gel goes a long way to prevent changing dough consistency.
- Cookies freeze well: baked cookies can be frozen in a single layer then bagged, and they thaw at room temperature in about 20 minutes.
My favorite part is how these bring everyone into the kitchen: rolling the red rope into the plain dough becomes a small collaborative act. Over the years I've learned to let the dough rest in the fridge longer if my kitchen is warm — it improves slicing and keeps the stripes crisp in the oven. The crushed candy cane topping always sparks conversation and makes a simple plate feel festive.
Storage Tips
Store cooled cookies in an airtight container with a layer of parchment between them to prevent sticking. At room temperature they keep well for up to 5 days; refrigeration tends to dry them out unless tightly sealed. For longer storage, freeze baked cookies flat on a tray, then transfer to a freezer bag and keep up to 3 months. Reheat briefly in a 300°F oven for 5 minutes to refresh the texture, or let thaw at room temperature for about 20 minutes.
Ingredient Substitutions
If you want a slightly softer cookie, substitute half the granulated sugar with light brown sugar (1:1 by volume) for added moisture and caramel notes. For a dairy-free version, swap the butter for a vegan butter stick with a 1:1 ratio and use a flax 'egg' (1 tablespoon ground flax + 3 tablespoons water) — flavor will be subtly different and texture slightly denser. You can also swap crushed candy canes for finely chopped peppermint baking chips if you prefer less sticky topping.
Serving Suggestions
Serve these with hot cocoa, peppermint mocha, or a sharp cheddar for an unexpected sweet-salty contrast. They’re lovely arranged on a festive platter with sprigs of rosemary or holly (non-edible for garnish only) and pair well with other small-bite sweets like shortbread or chocolate-dipped pretzels. For gift boxes, stack with parchment layers and include a small sealed packet of extra crushed candy cane.
Cultural Background
Candy cane imagery has been associated with Christmas since the 19th century; combining peppermint candy with classic sugar-based dough is a modern, playful take on holiday flavor. Sugar cookies themselves date back to European shortbreads and simple butter biscuits, evolving into the decorated cookies popular in American seasonal baking. These cookies merge the nostalgia of candy canes with the homestyle comfort of butter cookies.
Seasonal Adaptations
In winter, emphasize peppermint with a slightly larger (up to 3/4 teaspoon) peppermint extract if you prefer a bolder flavor. For spring or Valentine’s twists, swap peppermint for almond extract and tint the accent dough pink with gel coloring. Around Halloween, use orange gel and a dash of cinnamon for a spiced variation. The dough takes flavors well, so you can experiment by replacing the peppermint with citrus zest or espresso powder to suit the season.
Meal Prep Tips
Make dough logs in bulk and freeze them pre-sliced or as whole logs; pre-sliced frozen cookies can go straight to the oven with an extra minute of bake time. For cookie trays, bake a day ahead and store in an airtight tin with a slice of bread to maintain softness. Use a ruler for consistent slices if you want uniform cookies for gifting or contests — consistency helps with even bake times and presentation.
These candy cane cookies are a simple, joyful way to add a peppermint touch to holiday baking. They’re forgiving for beginners, fun for kids, and elegant enough for a cookie swap. Make the dough ahead, invite friends to help with the striping, and enjoy how a small twist — literally — can brighten the season.
Pro Tips
Use gel food coloring to avoid thinning the dough; a tiny amount yields vibrant color.
Chill the dough logs for at least 30 minutes to make slicing neater and to keep shapes in the oven.
If cookies spread too quickly, ensure butter was not overly soft and chill the dough longer before slicing.
This nourishing candy cane cookies recipe is sure to be a staple in your kitchen. Enjoy every moist, high protein slice — it is perfect for breakfast or as a wholesome snack any time.
Tags
Candy Cane Cookies
This Candy Cane Cookies recipe makes perfectly juicy, tender, and flavorful steak every time! Serve with potatoes and a side salad for an unforgettable dinner in under 30 minutes.
Ingredients
Cookie Dough
Instructions
Combine dry ingredients
Whisk together flour, baking powder, and salt in a medium bowl so the leavening distributes evenly and avoids pockets of baking powder.
Cream butter and sugar
Beat softened butter and granulated sugar until light and fluffy (2–3 minutes by hand mixer), which incorporates air for a tender texture.
Add egg and extracts
Beat in the egg, vanilla, and peppermint until combined and glossy; scrape down the bowl to ensure even mixing.
Tint a portion of dough
Remove roughly 1/4 of the dough and mix in a small amount of red gel food coloring until evenly colored for the candy-cane stripe.
Form logs and chill
Roll the plain dough into a log and the red dough into a thinner rope; press the red rope onto the plain log, wrap tightly, and chill at least 30 minutes.
Slice and bake
Preheat oven to 350°F. Slice logs into 1/4-inch rounds, place on parchment-lined sheets, optional sprinkle with crushed candy cane, and bake 8–10 minutes until edges set.
Cool and store
Cool on the pan 3–4 minutes before transferring to a wire rack. Store baked cookies in an airtight container up to 5 days or freeze for longer storage.
Last Step: Please leave a rating and comment letting us know how you liked this recipe! This helps our business to thrive and continue providing free, high-quality recipes for you.
Nutrition
Did You Make This?
Leave a comment & rating below or tag
@royalrecipe on social media!
Categories:
You might also like...

5-Minute Air Fryer Roasted Garlic Magic That Wows
Learn how a 5-minute prep transforms a whole garlic bulb into silky, caramelized cloves in the air fryer. Perfect as a spread, mix-in, or flavor booster that elevates weeknight meals and party plates.

Air-Fried Pizza Rolls
Golden, melty pizza rolls made in the air fryer—crispy outside, gooey inside, ready in under 20 minutes. Perfect for snacks, parties, or quick dinners.

Air-Fried Rice Paper Noodle Rolls
Crispy, light rolls filled with vermicelli, tofu or shrimp, and crisp vegetables—air-fried for a healthier crunch and quick prep.
Did You Make This?
Leave a comment & rating below or tag @royalrecipe on social media!
Rate This Recipe
Share This Recipe
Enjoyed this recipe? Share it with friends and family, and don't forget to leave a review!
Comments (1)
This recipe looks amazing! Can't wait to try it.
Comments are stored locally in your browser. Server comments are displayed alongside your local comments.

Hi, I'm Riley!
What's Popular

30-Minute Meals!
Join to receive our email series which contains a round-up of some of our quick and easy family favorite recipes.