
Christmas Cookie Bars

Buttery, festive cookie bars studded with chocolate chips and colorful sprinkles—easy to make, perfect for holiday plates and potlucks.
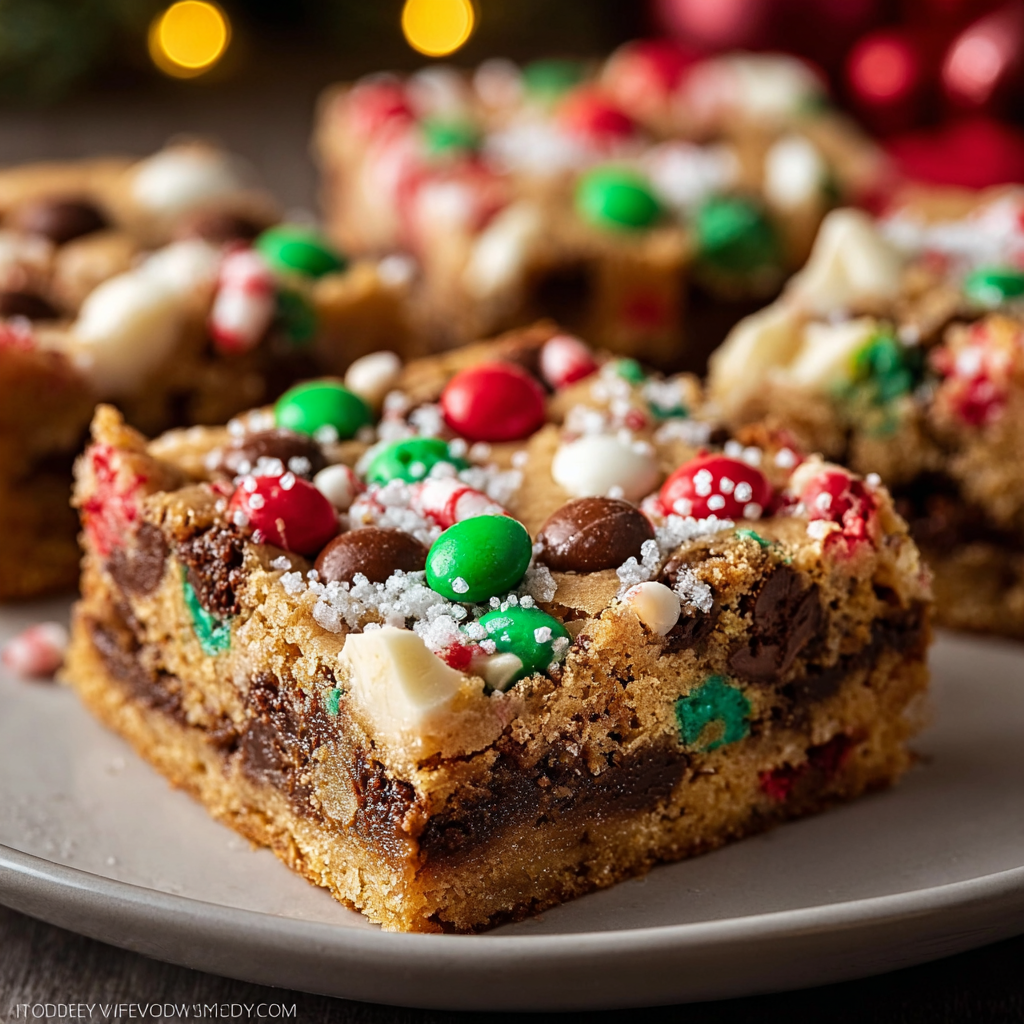
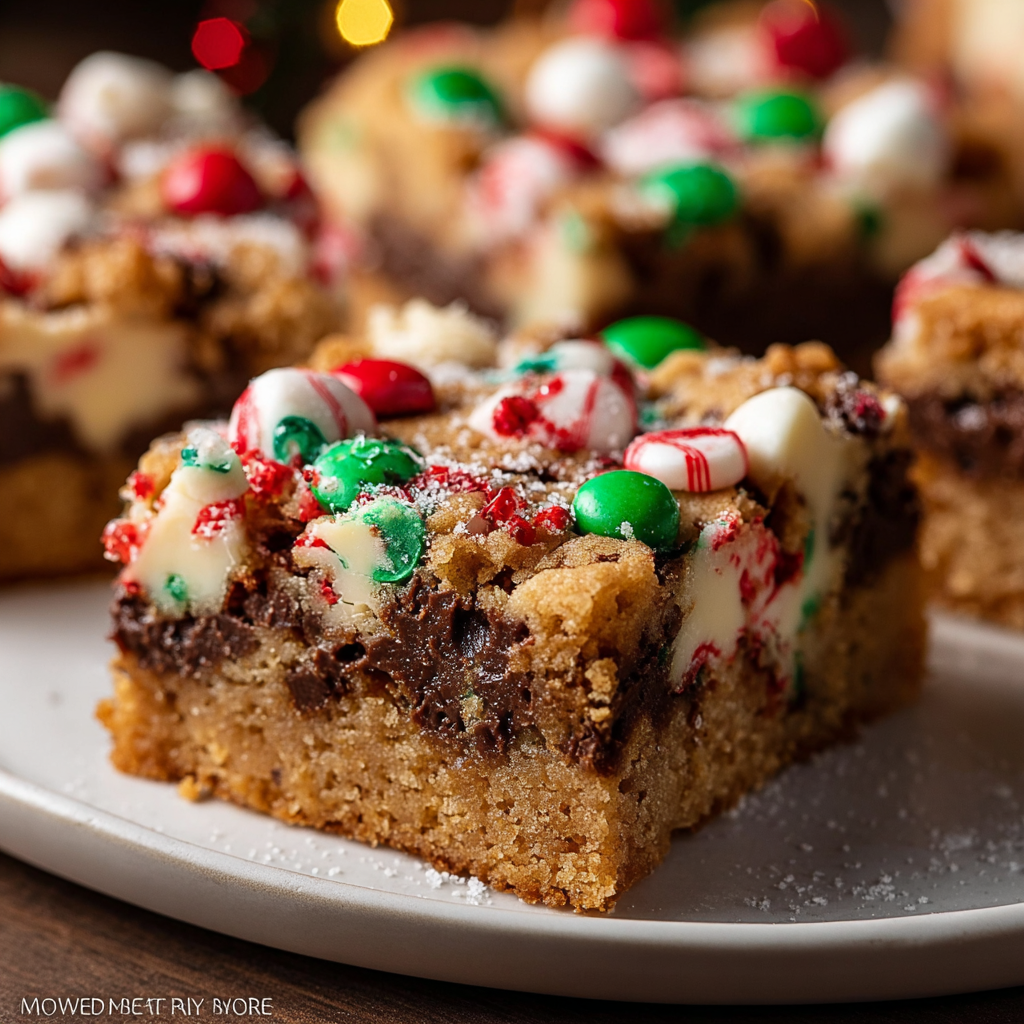
This batch of Christmas Cookie Bars has been my favorite holiday shortcut for years. I discovered the loose idea while trying to simplify a beloved cookie recipe on a night when I knew I'd have to feed a crowd: my in-laws, four nieces, and a neighbor who always swings by with mystery pies at Christmastime. Turning individual cookies into a single tray transformed the whole process—less shaping, more oven efficiency, and a pan full of warm, sliceable cookie joy that everyone can grab as they mingle. The bars blend a crisp edge with a chewy center, and the chocolate chips and sprinkles make each slice feel celebratory.
The texture is what sold me. With a light brown-sugar depth and a buttery backbone, these bars offer the toasty chew of a well-made cookie but with the convenience of sheet-baked service. I usually make them in a 9x13-inch pan; I let the edges caramelize slightly while keeping the middle tender. They store well and travel beautifully—I've brought them to cookie exchanges, wrapped them as edible gifts, and even used smaller slices for dessert at big dinners. The aroma of butter, vanilla, and melting chocolate will consistently gather people to the kitchen.
Why You'll Love This Recipe
- Sheet-pan format saves time: no extra scooping or chilling required—ready in roughly 45 minutes from start to finish, including bake time and a short cool.
- Uses pantry staples: basic flour, sugar, butter, eggs, and chocolate chips—easy to pull together even if the holiday shopping list is long.
- Crowd-pleaser for parties and potlucks: slices are easy for guests to pick up and the sprinkles make them instantly festive without extra effort.
- Customizable mix-ins: fold in nuts, dried fruit, or different chips to suit dietary needs or flavor preferences with minimal recipe changes.
- Make-ahead friendly: bake a day ahead and store airtight, or freeze slices for up to three months to prep your holiday spread in advance.
From my first tray, family reactions convinced me this would become a staple. My uncle—who usually avoids overly sweet treats—asked for seconds, and a neighbor commented on how the bars tasted like a classic bakery version. Cooking discoveries included the advantage of slightly browning the butter-flavored edges for extra depth and the visual magic a scattering of sprinkles can create when serving a mixed-age crowd.
Ingredients
- Unsalted butter (1 cup): Use high-quality European-style butter if possible for a richer flavor; softened to room temperature for even creaming and glossy texture.
- Granulated sugar (1 cup): Provides sweetness and helps the edges crisp—use regular white sugar for classic structure and reliable browning.
- Brown sugar, packed (1 cup): Adds chew and caramel notes; light or dark brown sugar both work—dark gives a deeper molasses flavor.
- Large eggs (2): Bring structure and moisture; use at room temperature to improve emulsification when creaming with butter.
- Vanilla extract (2 teaspoons): Pure vanilla gives the best aromatic lift—if you have Madagascar vanilla, it pairs beautifully with the brown sugar.
- All-purpose flour (3 cups): The recipe calls for regular flour for a tender crumb—measure by spooning into the cup and leveling for accuracy.
- Baking powder & baking soda (1 tsp each): A small lift from both gives a light lift without turning the bars cake-like; ensure your leavening is fresh.
- Salt (1/2 tsp): Balances sweetness; use fine sea salt or table salt measured accurately.
- Chocolate chips (2 cups): Semi-sweet or milk chocolate works—use good quality chips for melt and flavor; mini chips distribute more evenly.
- Chopped nuts (1 cup, optional): Toasted walnuts or pecans add crunch and a toasty note—omit for nut-free options.
- Festive sprinkles (1/2 cup): For decoration—add after baking while bars are slightly tacky so sprinkles adhere without bleeding color.
Instructions
Prepare the oven and pan: Preheat the oven to 350°F (175°C). Line a 9x13-inch pan with parchment leaving an overhang for easy removal, or grease the pan well. This ensures clean slices and prevents sticking at the edges. Position the oven rack in the center for even heat circulation. Cream butter and sugars: In a large bowl, beat 1 cup softened unsalted butter with 1 cup granulated sugar and 1 cup packed brown sugar until light and fluffy, about 2–3 minutes with an electric mixer. Scrape the bowl to incorporate any sugar crystals—proper creaming traps air for a tender, slightly risen bar. Add eggs and vanilla: Beat in 2 large eggs one at a time, allowing the first to incorporate fully before adding the second. Add 2 teaspoons vanilla extract and mix until homogeneous. Room-temperature eggs mix more smoothly and prevent the butter from seizing. Combine dry ingredients: In a separate bowl, whisk together 3 cups all-purpose flour, 1 teaspoon baking powder, 1 teaspoon baking soda, and 1/2 teaspoon salt. Whisking ensures even distribution of leavening—avoid over-mixing once combined. Fold and finish the batter: Gradually add the dry ingredients to the wet, mixing on low just until no streaks of flour remain. Fold in 2 cups chocolate chips and 1 cup chopped nuts if using. The batter should be thick but spreadable; scrape down the sides to prevent pockets of flour. Spread and bake: Spread the batter evenly in the prepared pan using an offset spatula or lightly greased hands. Smooth the top, and bake at 350°F (175°C) for 20–25 minutes until the edges are golden brown and a toothpick inserted in the center comes out with a few moist crumbs. Avoid over-baking to maintain a chewy center. Add sprinkles and cool: Within 2–3 minutes of removing the pan from the oven, sprinkle 1/2 cup festive sprinkles evenly over the top so they adhere. Cool completely in the pan on a wire rack—about 1 to 1.5 hours—before using the parchment overhang to lift the slab for slicing into bars.
You Must Know
- These bars keep well at room temperature for up to 2 days in an airtight container, and refrigerated for up to 5 days.
- They freeze beautifully: wrap sliced bars individually in parchment and freeze for up to 3 months—thaw at room temperature for 30–60 minutes.
- For nut-free households, simply omit the nuts and substitute an equal amount of extra chocolate chips or toasted oats for texture.
- Watch your bake time closely; because of pan variations, the center can go from perfectly chewy to dry in minutes—pull when center still has moist crumbs.
My favorite part is how flexible this formula is. For one holiday I swapped half the chips for chopped peppermint candy and everyone loved the seasonal twist. Another year I doubled the sprinkles and packaged small stacks tied with twine for neighbors—easy, thoughtful, and tasty. Small changes can customize flavor while keeping the simple, reliable method intact.
Storage Tips
Store the cooled bars in an airtight container layered with parchment to prevent sticking; keep them at room temperature for short-term serving (up to 48 hours). For longer storage, refrigerate up to five days—bring to room temperature before serving for best texture. When freezing, slice first and arrange bars in a single layer on a baking sheet to flash-freeze, then transfer to a freezer bag or container. Reheat from frozen in a 300°F oven for 8–10 minutes or microwave briefly for a warm bite. Look for glossy chocolate and a slightly flexible center as indicators of freshness.
Ingredient Substitutions
If you need dairy-free bars, substitute a plant-based butter stick of similar fat content and use dairy-free chocolate chips; texture will be very close. To make them gluten-free, use a 1:1 gluten-free flour blend that contains xanthan gum—expect slightly different browning. Swap half the chocolate chips for white chips, toffee bits, or dried cranberries for a fruity note. For lower sugar, reduce granulated sugar to 3/4 cup and increase brown sugar to 1 1/4 cups for moisture—this alters sweetness but keeps chewiness.
Serving Suggestions
Slice into modest bars for cookie platters or into larger squares for dessert plates; garnish with a light dusting of powdered sugar or a drizzle of melted chocolate for a refined finish. Serve warm with coffee, hot cocoa, or a spiced chai—these pairings balance the sweetness. For holiday brunches, present alongside fruit, nuts, and a selection of tea cookies to create an inviting spread. For gifting, wrap stacks in parchment and tie with ribbon, or place in decorative tins with a layer of wax paper.
Cultural Background
Cookie bars are part of an American tradition to streamline holiday baking while preserving the flavors of classic drop cookies. They likely evolved from sheet-baked variations of popular cookies to save time during busy seasons—perfect for large family gatherings and bake sales. Over time, regional adaptations added local flavors: peppermint and cranberries in the Northeast, citrus zest in warmer climates, and nut-studded versions in homes with strong baking heritages. This practical format reflects the holiday spirit—bringing warmth, sweetness, and sharing to the table with minimal fuss.
Seasonal Adaptations
Adapt the bars by season: swap sprinkles for chopped candied ginger and crystallized citrus in winter, or use shredded coconut and macadamia nuts for a tropical summer spin. Holiday celebrations call for peppermint or spiced molasses chips; Thanksgiving is an excellent time to add toasted pumpkin seeds and cinnamon. For birthday parties, match sprinkles to a color theme. Technique adjustments include toasting nuts for 5–7 minutes at 350°F to deepen flavor or folding in dried fruit to introduce a pleasant chew.
Meal Prep Tips
Prepare the batter the night before and refrigerate in the pan (covered) to simplify morning baking—allow an extra 5 minutes in the oven if chilled. Alternatively, freeze a portion of the unbaked slab in the pan (wrapped tightly) for up to 2 weeks; bake from frozen, adding 5–10 minutes. Portion bars into single-serve packs for lunches or on-the-go treats. Label containers with bake dates and include reheating instructions for quick service: 15–20 seconds in the microwave or 6–8 minutes in a 325°F oven for a freshly baked experience.
These bars are about community: a simple method that yields something joyful and shareable. Whether you keep them classic or give them a seasonal twist, they’re a dependable way to spread holiday cheer—and they make the kitchen smell like celebration.
Pro Tips
Use room-temperature eggs and butter to ensure smooth creaming and an even batter.
Don’t overbake; remove when a toothpick shows moist crumbs for a chewy center.
Allow full cooling before slicing to get neat edges; warm bars will crumble.
This nourishing christmas cookie bars recipe is sure to be a staple in your kitchen. Enjoy every moist, high protein slice — it is perfect for breakfast or as a wholesome snack any time.
Tags
Christmas Cookie Bars
This Christmas Cookie Bars recipe makes perfectly juicy, tender, and flavorful steak every time! Serve with potatoes and a side salad for an unforgettable dinner in under 30 minutes.
Ingredients
Base
Dry
Mix-ins & Decoration
Instructions
Prepare oven and pan
Preheat oven to 350°F (175°C). Line a 9x13-inch pan with parchment or grease well; set aside. Center the oven rack for even baking.
Cream butter and sugars
Beat 1 cup softened unsalted butter with 1 cup granulated sugar and 1 cup packed brown sugar until light and fluffy, about 2–3 minutes.
Add eggs and vanilla
Add 2 large room-temperature eggs one at a time, then 2 teaspoons vanilla, mixing until fully incorporated.
Combine dry ingredients
Whisk together 3 cups all-purpose flour, 1 teaspoon baking powder, 1 teaspoon baking soda, and 1/2 teaspoon salt in a separate bowl to ensure even distribution.
Fold in mix-ins and bake
Add dry ingredients to wet on low speed until just combined. Fold in 2 cups chocolate chips and 1 cup nuts if using. Spread in pan and bake 20–25 minutes until edges are golden and center has moist crumbs.
Cool, decorate, and slice
Sprinkle 1/2 cup festive sprinkles over the warm slab to adhere. Cool completely in pan before lifting with parchment and slicing into 24 bars.
Last Step: Please leave a rating and comment letting us know how you liked this recipe! This helps our business to thrive and continue providing free, high-quality recipes for you.
Nutrition
Did You Make This?
Leave a comment & rating below or tag
@royalrecipe on social media!
Categories:
You might also like...

5-Minute Air Fryer Roasted Garlic Magic That Wows
Learn how a 5-minute prep transforms a whole garlic bulb into silky, caramelized cloves in the air fryer. Perfect as a spread, mix-in, or flavor booster that elevates weeknight meals and party plates.

Air-Fried Pizza Rolls
Golden, melty pizza rolls made in the air fryer—crispy outside, gooey inside, ready in under 20 minutes. Perfect for snacks, parties, or quick dinners.

Air-Fried Rice Paper Noodle Rolls
Crispy, light rolls filled with vermicelli, tofu or shrimp, and crisp vegetables—air-fried for a healthier crunch and quick prep.
Did You Make This?
Leave a comment & rating below or tag @royalrecipe on social media!
Rate This Recipe
Share This Recipe
Enjoyed this recipe? Share it with friends and family, and don't forget to leave a review!
Comments (1)
This recipe looks amazing! Can't wait to try it.
Comments are stored locally in your browser. Server comments are displayed alongside your local comments.

Hi, I'm Riley!
What's Popular

30-Minute Meals!
Join to receive our email series which contains a round-up of some of our quick and easy family favorite recipes.