
Mint Swirl Cookies

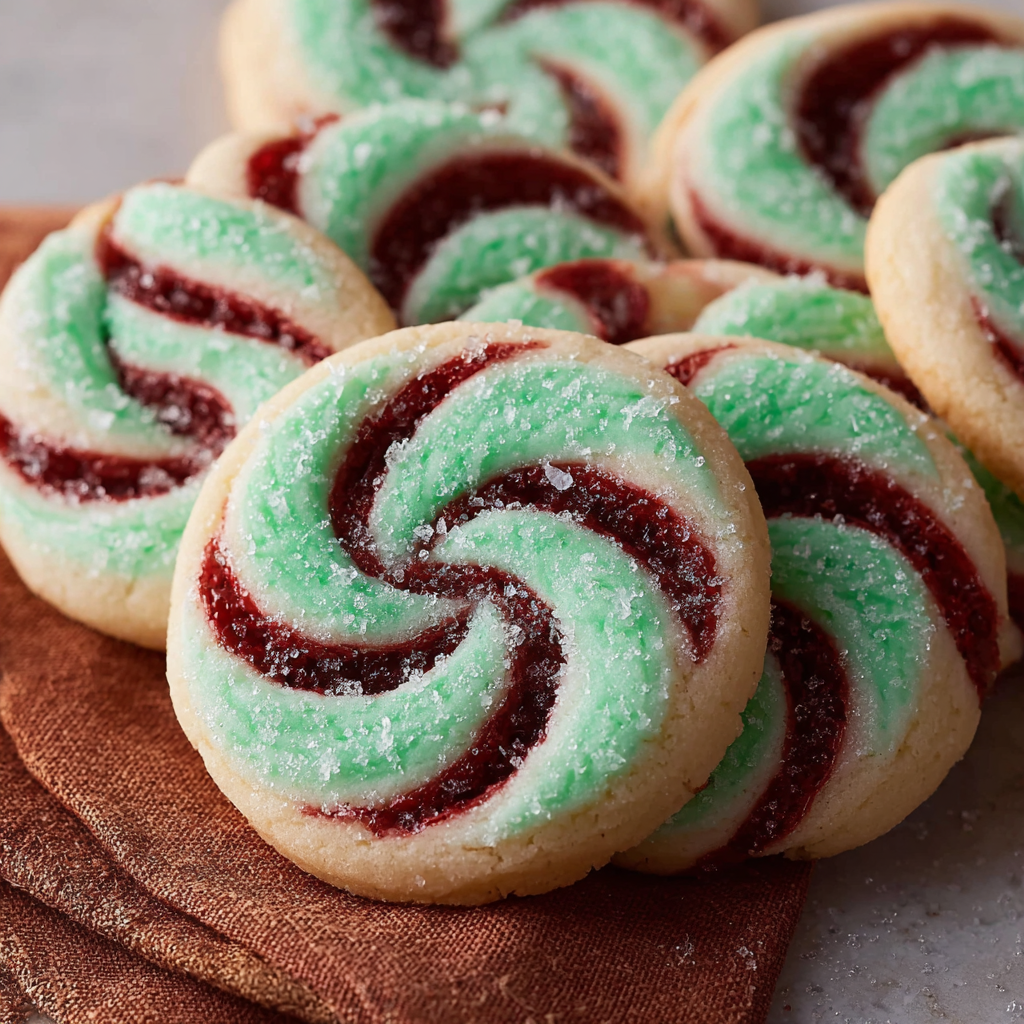
Buttery, tender cookies with a festive red-and-green swirl, kissed with peppermint and finished in a crunchy sugar or crushed candy coating—perfect for holidays and cookie swaps.

This recipe for Mint Swirl Cookies is one of those joyful discoveries that began as a holiday experiment and quickly became a requested classic. I found the combination of bright peppermint and a soft, buttery cookie during a blustery December when I wanted something that looked festive but stayed simple enough for a busy afternoon with the kids. The red swirl gives these cookies a nostalgic, handmade look while the peppermint extract keeps the flavor clean and refreshing, not overpowering. Every batch has produced the same reaction: smiles, a second helping, and messages asking for the recipe.
What makes these cookies special is the texture contrast: a tender, shortbread-like base that yields to a slight crunch when rolled in coarse sugar or crushed peppermints. The dough handles beautifully, and the swirl technique is forgiving; you don’t need perfect piping or advanced skills to get a delightful result. I often make a double batch for parties because they photograph beautifully and hold up well on a cookie platter—no fiddly frosting required.
Why You'll Love This Recipe
- Easy technique: the swirl is created by stacking and rolling two dough logs, so no special tools or advanced decorating skills are necessary.
- Fast to prepare: active time is about 25 minutes and bake time is roughly 12 minutes per batch—perfect for last-minute trays or spontaneous baking sessions.
- Pantry-friendly ingredients: uses everyday items like all-purpose flour, sugar, butter, and an egg; peppermint extract is the only specialty item you might need.
- Make-ahead friendly: dough chills well and can be wrapped and frozen for up to 1 month, making it ideal for holiday prep or meal planning.
- Crowd-pleasing: festive color and a crisp coating make these a hit at parties, cookie swaps, and school events—parents and kids both love them.
- Flexible finishing: roll in coarse sugar for a sparkly finish or crushed peppermint candies for extra crunch and color.
I first shared these at a neighborhood cookie swap and watched them disappear within the first half hour. My partner declared them the best peppermint cookie I’d made, and the kids insisted on helping with the swirl step every single time. Over the years I’ve adjusted chilling times and the amount of peppermint extract to get a balanced flavor—enough mint to be unmistakable, but never so much that it becomes medicinal.
Ingredients
- All-purpose flour (2 1/2 cups): Use a trusted brand like King Arthur or Gold Medal; spoon and level into the cup for accuracy. The flour gives structure without making the cookie tough when measured properly.
- Baking powder (1 teaspoon): Provides a gentle lift to keep the cookie from being too dense—check freshness by ensuring it still reacts with water if it’s older than a year.
- Salt (1/2 teaspoon): Balances sweetness and enhances the butter flavor; kosher or fine sea salt both work—if using table salt, reduce slightly.
- Unsalted butter (1 cup / 2 sticks), softened: Softened to room temperature (about 65–70°F) gives the best creaming results; European-style butters like Plugrá add richness but are optional.
- Granulated sugar (1 cup): Creates a tender crumb and a clean, crisp coating when using coarse sugar—superfine sugar can be used for a slightly quicker dissolve in the dough.
- Large egg (1): Brings structure and moisture—use a room-temperature egg so it blends smoothly into the creamed butter and sugar.
- Vanilla extract (1 teaspoon): Choose pure vanilla extract (e.g., McCormick or Nielsen-Massey) to round out flavors and support the peppermint without competing.
- Peppermint extract (1 teaspoon): Potent—start with 1 teaspoon and taste the unbaked batter if unsure; adjust slightly but avoid overdoing it to prevent a soapy aftertaste.
- Red gel food coloring: A few drops of gel coloring deliver vibrant color without adding liquid; AmeriColor or Wilton gels are good choices.
- Coating (1/4 cup): Use coarse sanding sugar for a sparkly finish or finely crushed peppermint candies for crunch and extra mint flavor.
Instructions
Prepare the dry ingredients: Whisk together 2 1/2 cups all-purpose flour, 1 teaspoon baking powder, and 1/2 teaspoon salt in a medium bowl until evenly combined. Sifting is optional; just ensure there are no lumps so the dough develops uniformly during mixing (about 1–2 minutes). Cream butter and sugar: In a large bowl, beat 1 cup softened unsalted butter with 1 cup granulated sugar on medium speed using a hand mixer or stand mixer fitted with the paddle attachment. Cream until light and fluffy—about 3 to 4 minutes—stopping to scrape the bowl once. Proper creaming traps air that gives the cookie a tender lift. Add egg and extracts: Beat in 1 large room-temperature egg, 1 teaspoon vanilla extract, and 1 teaspoon peppermint extract until blended and smooth. Mix just until combined to avoid overworking the dough; overmixing can develop gluten and make the texture tougher. Combine dry and wet: Fold the dry ingredients into the butter mixture on low speed or with a spatula until a cohesive dough forms. Aim for a soft, slightly firm dough that’s easy to shape; it should not be sticky. If too soft, chill for 10 minutes to firm up. Divide and color: Divide dough roughly in half. Leave one portion plain and tint the other with a few drops of red gel food coloring to achieve a ruby hue. Knead the coloring in gently until evenly distributed, wearing gloves if you prefer to keep your hands stain-free. Create the swirl: On a lightly floured surface, roll each portion into a log about 1 1/2 inches in diameter. Place the red log alongside the plain log, pressing gently to join along the length, then roll them together into a single, slightly oval log so the colors spiral. Wrap tightly in plastic wrap and chill for 30 minutes to 1 hour to firm up—this makes slicing cleaner. Slice, coat, and bake: Preheat the oven to 350°F. Line baking sheets with parchment. Unwrap the chilled log and slice into 1/4- to 1/2-inch rounds using a sharp knife. Roll the edges in 1/4 cup coarse sugar or crushed peppermint candies, arrange 1 inch apart on the sheet, and bake for 10–12 minutes until the edges are just set and the centers no longer look wet. Cool and enjoy: Transfer cookies to a cooling rack after 2 minutes on the baking sheet; they’ll firm up as they cool. Let cool completely to retain crisp edges and tender centers. Store in an airtight container layered with parchment for up to 5 days.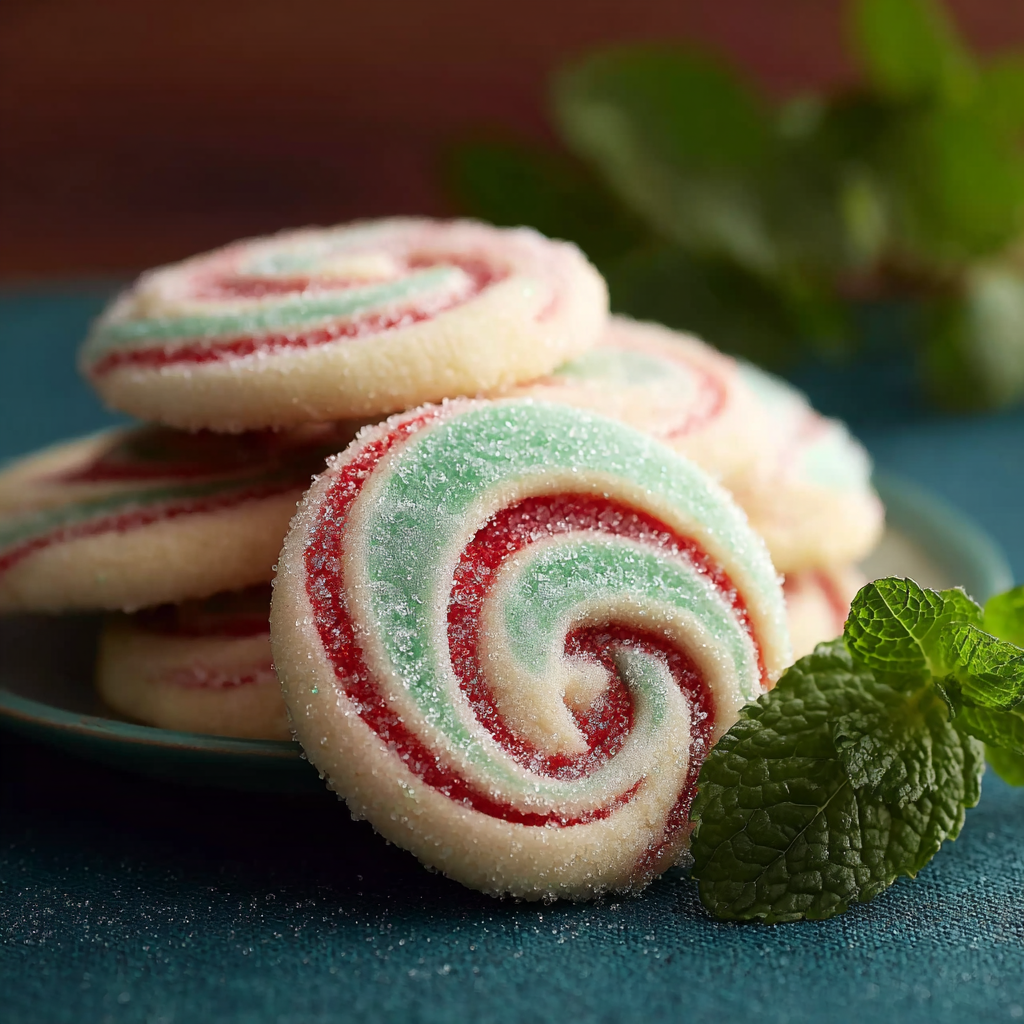
You Must Know
- These cookies freeze well: shaped logs can be wrapped tightly and frozen for up to 1 month; slice from frozen and add an extra minute to bake time.
- High in simple carbs and calories per cookie—great as an occasional treat; each cookie is roughly 95 kcal depending on size and coating.
- Use coarse sanding sugar for a sparkly finish, or crushed peppermints for added texture and mint intensity.
- Chilling the dough is essential: it prevents spreading and preserves the crisp swirl; 30–60 minutes is ideal depending on kitchen temperature.
- These are not gluten-free and contain dairy and eggs—see substitutions section for alternative options.
My favorite part is the moment the pan comes out of the oven: the peppermint scent rises and the red swirl always looks like a little festive ribbon. Guests comment on the color and the delicate peppermint flavor—these are the cookies people remember and ask for at holiday gatherings. Because the dough is forgiving, the recipe has become my go-to when I need a reliable, pretty cookie that travels well and keeps its character on a crowded platter.
Storage Tips
Store cooled cookies in an airtight container at room temperature for up to 5 days. Separate layers with parchment to prevent sticking, especially if you’ve used crushed peppermint candy for coating. For longer storage, freeze baked cookies in a single layer on a sheet tray until firm, then transfer to a freezer-safe container for up to 3 months. To refresh crispness after thawing, warm briefly in a 300°F oven for 3–5 minutes—watch carefully to prevent browning. Unbaked logs freeze excellently; slice them from frozen and bake directly for convenience.
Ingredient Substitutions
For dairy-free needs, replace butter with a vegan stick margarine measured 1:1 and use a flax egg (1 tbsp ground flax + 3 tbsp water, chilled 10 minutes) in place of the egg—note the texture will be slightly more fragile. To make them gluten-free, use a 1:1 gluten-free flour blend with xanthan gum included; chilling time may need to be extended to 1 hour for cleaner slices. If peppermint extract is unavailable, substitute with 1/2 teaspoon peppermint oil or 1 teaspoon finely crushed peppermint candies blended into the dough, but reduce other liquid if using oil.
Serving Suggestions
Arrange on a festive platter with sprigs of fresh mint for color contrast, or pair with dark chocolate-dipped edges for an elevated presentation. These are lovely beside coffee, hot cocoa, or a peppermint mocha. For gift-giving, stack in a decorative tin with layers of parchment and include a small bag of crushed peppermints for guests to add extra topping. They work well at cookie swaps because they hold their shape and retain flavor over several days.
Cultural Background
Swirl cookies are a playful variation on classic pinwheel or rolled cookies that date back to early 20th-century baking, when contrasting doughs were used for visual appeal without relying on icing. The addition of peppermint is a seasonal evolution—peppermint and candy cane flavors became popular in American baking in the mid-1900s, and pairing mint with shortbread-like doughs is a modern twist that nods to both tradition and contemporary holiday aesthetics.
Seasonal Adaptations
In winter, stick with peppermint and red coloring for holiday flair; in spring, swap peppermint for almond extract and use pastel gel colors instead. For autumn, replace peppermint with a touch of ground cinnamon and a splash of maple extract, using orange gel for a warm swirl. For Valentine’s Day, double the red or try a strawberry extract with crushed freeze-dried strawberries for natural coloring and a fruitier profile.
Meal Prep Tips
Make dough ahead by preparing and chilling logs; wrap each log in plastic and refrigerate for 3 days or freeze for up to 1 month. On bake day, slice and coat straight from the fridge or freezer—frozen slices need an extra minute in the oven. Pre-measuring the dry ingredients into zip-top bags and keeping extracts ready speeds assembly to under 30 minutes, making this an excellent cookie to batch-produce for events or holiday boxes.
These Mint Swirl Cookies are a cheerful, easy-to-execute treat that reward a little planning with beautiful results. I hope they become a staple on your baking list as they have on mine—bright, minty, and reliably delicious.
Pro Tips
Chill shaped logs for at least 30 minutes to prevent excessive spreading and ensure clean slices.
Use gel food coloring instead of liquid to avoid altering dough consistency.
If dough feels too sticky after mixing, refrigerate for 10–15 minutes before rolling to firm it up.
Slice with a very sharp knife and wipe the blade between cuts for neat edges.
This nourishing mint swirl cookies recipe is sure to be a staple in your kitchen. Enjoy every moist, high protein slice — it is perfect for breakfast or as a wholesome snack any time.
Tags
Mint Swirl Cookies
This Mint Swirl Cookies recipe makes perfectly juicy, tender, and flavorful steak every time! Serve with potatoes and a side salad for an unforgettable dinner in under 30 minutes.
Ingredients
Cookie Dough
Coating
Instructions
Combine dry ingredients
Whisk together flour, baking powder, and salt until evenly mixed; set aside to ensure even distribution of leavening.
Cream butter and sugar
Beat softened butter and granulated sugar until light and fluffy, about 3–4 minutes; proper creaming incorporates air for a tender texture.
Add egg and extracts
Mix in the egg, vanilla, and peppermint extract on low speed until just combined to avoid overworking the dough.
Incorporate dry ingredients
Fold the dry mixture into the wet ingredients on low speed or by hand until a cohesive dough forms; avoid overmixing to keep the cookies tender.
Divide and color the dough
Split dough in half; tint one half with red gel food coloring until evenly colored, then form each half into 1 1/2-inch logs.
Form the swirl and chill
Press the two logs together lengthwise and roll to create a spiral, wrap tightly in plastic, and chill for 30–60 minutes for clean slicing.
Slice and coat
Preheat oven to 350°F. Slice chilled log into 1/4- to 1/2-inch rounds, roll edges in coarse sugar or crushed candy, and place on prepared sheets 1 inch apart.
Bake and cool
Bake for 10–12 minutes until edges are set; cool on sheet 2 minutes before transferring to a rack. Cookies firm up as they cool.
Last Step: Please leave a rating and comment letting us know how you liked this recipe! This helps our business to thrive and continue providing free, high-quality recipes for you.
Nutrition
Did You Make This?
Leave a comment & rating below or tag
@royalrecipe on social media!
Categories:
You might also like...

5-Minute Air Fryer Roasted Garlic Magic That Wows
Learn how a 5-minute prep transforms a whole garlic bulb into silky, caramelized cloves in the air fryer. Perfect as a spread, mix-in, or flavor booster that elevates weeknight meals and party plates.

Air-Fried Pizza Rolls
Golden, melty pizza rolls made in the air fryer—crispy outside, gooey inside, ready in under 20 minutes. Perfect for snacks, parties, or quick dinners.

Air-Fried Rice Paper Noodle Rolls
Crispy, light rolls filled with vermicelli, tofu or shrimp, and crisp vegetables—air-fried for a healthier crunch and quick prep.
Did You Make This?
Leave a comment & rating below or tag @royalrecipe on social media!
Rate This Recipe
Share This Recipe
Enjoyed this recipe? Share it with friends and family, and don't forget to leave a review!
Comments (1)
This recipe looks amazing! Can't wait to try it.
Comments are stored locally in your browser. Server comments are displayed alongside your local comments.

Hi, I'm Riley!
What's Popular

30-Minute Meals!
Join to receive our email series which contains a round-up of some of our quick and easy family favorite recipes.