
Peppermint Swirl Sugar Cookies

Buttery sugar cookies rolled into a festive peppermint swirl and coated in sparkling sanding sugar — perfect for holidays and cookie swaps.
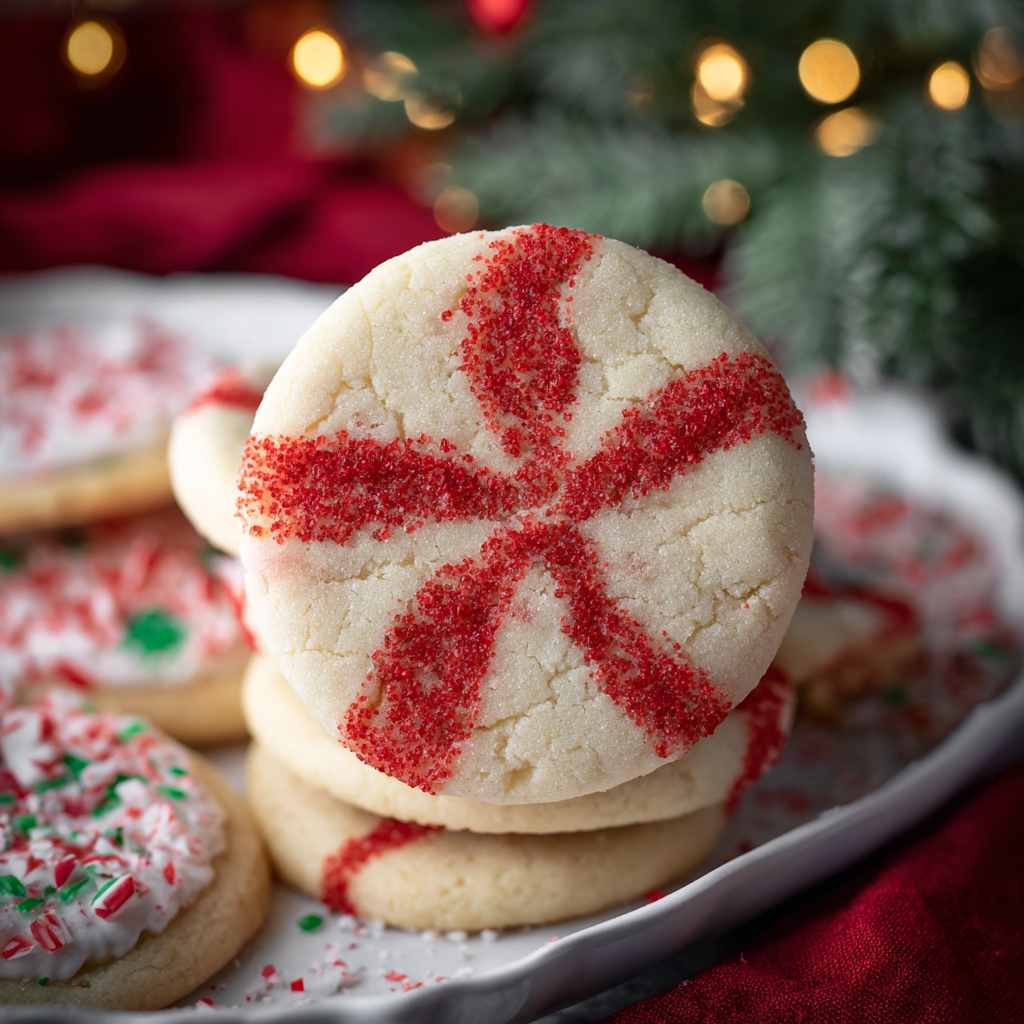
This batch of peppermint swirl sugar cookies has been my holiday signature for years. I first developed the swirl technique during a snowy December when I wanted something classic yet a little theatrical for our annual cookie exchange. The memory of that first tray coming out of the oven — warm, soft centers with crisp edges and a hint of cooling peppermint — still makes me smile. They are buttery and tender, not overly sweet, and the peppermint adds a clean finish that brightens each bite.
I love this version because it looks impressive but uses pantry-friendly ingredients and a few simple techniques. The dough is forgiving: a short chill, a gentle roll-and-stack method, and a quick slice yields beautiful pinwheel cookies every time. Family members love the candy-cane look, and these cookies travel well, making them ideal for gifting. If you’ve been searching for a show-stopping but reliable cookie to make for a party or to share with neighbors, this one delivers on texture, flavor, and presentation.
Why You'll Love This Recipe
- Appealing presentation: the red-and-white swirl looks festive and professional without advanced piping or shaping skills.
- Quick to prepare: active hands-on time is about 25 minutes and the cookies bake in 10–12 minutes, so you can finish a batch in under an hour including chilling.
- Pantry-friendly: uses basic staples like butter, sugar, flour, and cornstarch — no specialty flours required.
- Make-ahead friendly: dough can be chilled or frozen, making it easy to plan ahead for holidays or parties.
- Crowd-pleaser: mild peppermint and vanilla keep the flavor familiar for kids while adults appreciate the buttery crumb.
In my experience, guests always comment on how delicate the texture is — crisp at the edges with a tender, melt-in-your-mouth center. I started making these the year my niece insisted on helping with food coloring; her enthusiasm for the red swirl became part of the tradition and now she measures the sanding sugar every year.
Ingredients
- Unsalted butter: 1 cup (2 sticks) at room temperature. Use a quality European-style butter if you want a richer flavor; let it soften on the counter for about 30 minutes so it creams smoothly.
- Granulated sugar: 1 3/4 cups. This gives a balanced sweetness and helps the cookie keep a light, tender texture.
- Eggs: 1 large egg plus 1 large egg yolk. The extra yolk adds richness and chew without making the dough cakey.
- Peppermint extract: 1 1/2 teaspoons (optional). Pure peppermint extract offers a clean mint flavor; use almond extract as an alternative for a different aromatic note.
- Vanilla extract: 1 teaspoon. Vanilla bean paste or pure extract will both work — it rounds out the peppermint.
- All-purpose flour: 2 1/2 cups. Spoon and level into the cup to avoid packing; if your flour is sifted at the mill, reduce slightly by a tablespoon.
- Cornstarch: 1 tablespoon. This is the secret to a soft, tender crumb and helps prevent a dense cookie.
- Fine salt: 1 teaspoon. Balances sweetness and enhances butter flavor.
- Baking soda: 1/2 teaspoon. Just enough lift for a soft cookie without spreading too thin.
- Red gel food coloring: a few drops — gel gives a vivid color without thinning the dough.
- Coating: 1 cup white sanding sugar (or granulated sugar) for rolling and sparkle.
Instructions
Make the dough: In a large bowl, cream 1 cup room-temperature unsalted butter with 1 3/4 cups sugar until light and fluffy, about 3–4 minutes with an electric mixer. Scrape down the sides. Add the whole egg and the egg yolk, mixing until incorporated. Stir in 1 1/2 teaspoons peppermint extract (or almond extract if using) and 1 teaspoon vanilla until evenly distributed. The mixture should be smooth and glossy. Combine dry ingredients: Whisk together 2 1/2 cups all-purpose flour, 1 tablespoon cornstarch, 1 teaspoon fine salt, and 1/2 teaspoon baking soda in a separate bowl. Add the dry mix to the butter mixture in three additions on low speed, mixing just until the dough comes together. Overmixing will develop gluten and make the cookies tough. Portion and color: Divide the dough roughly in half. Keep one half plain; to the second half, add a few drops of red gel food coloring and knead gently until the color is even. If you prefer a deeper red, add color sparingly — gel color intensifies as it rests. Form the roll: On plastic wrap, pat each half into a rough rectangle about 8 x 6 inches. Stack the colored piece on top of the plain piece, pressing lightly to adhere. Roll the layered dough into a tight log, about 2 inches in diameter, using the wrap to help form an even cylinder. Chill the log for at least 1 hour — chilling firms the butter and makes thin, clean slices. Sugar coat and slice: Pour 1 cup sanding sugar into a shallow bowl. Remove the dough log from the wrap and roll it in the sugar to coat the outside. Using a sharp knife chilled in the freezer, slice the log into 1/4- to 3/8-inch rounds. Arrange on parchment-lined baking sheets about 1 inch apart. Bake: Heat the oven to 350°F (177°C). Bake cookies for 10–12 minutes, until the edges are set and the centers look slightly underbaked — the cookies will firm as they cool. Rotate the sheet halfway through if your oven has hot spots. Let cool on the pan for 5 minutes, then transfer to a rack to cool completely.
You Must Know
- These are not long-term freezer cookies: dough freezes well for up to 3 months if wrapped tightly, and baked cookies keep 3–4 days at room temperature in an airtight tin.
- High in simple carbs and sugar — enjoy as an occasional treat. Each cookie is roughly 160 calories depending on size.
- Chilling is essential — it prevents spreading and preserves the swirl. Skip chilling and your cookies will likely flatten.
- Great for gifting: stack between parchment and store in a sturdy box to prevent breakage.
My favorite part is watching the swirl reveal as guests lift a cookie — there’s always a small cheer. The first time I brought these to a cookie swap, someone asked if I used professional equipment; it’s always a good day when a simple technique makes people think you spent hours on detail.

Storage Tips
Store completely cooled cookies in an airtight container at room temperature for up to 4 days. To keep them crisp, separate layers with parchment paper and avoid stacking too high. For longer storage, freeze baked cookies in a single layer on a sheet, then transfer to a zip-top bag; they’ll keep for 2–3 months. Reheat gently in a 300°F oven for 4–6 minutes to revive the just-baked texture.
Ingredient Substitutions
If you don’t have cornstarch, substitute with an equal amount of arrowroot or reduce flour by 1 tablespoon and add 1 tablespoon potato starch. For extract swaps, use 1 teaspoon peppermint plus a touch of almond for a brighter profile. Use butter-flavored shortening to make the dough more shelf-stable, but note it will change flavor and mouthfeel. For a gluten-free version, use a 1:1 gluten-free flour blend and add 1 teaspoon xanthan gum for structure.
Serving Suggestions
Serve alongside hot cocoa or peppermint coffee for a themed pairing. For a party platter, alternate the cookies with mini candy canes and dark chocolate squares for contrast. Garnish with a light dusting of powdered sugar for a snowy look, or sandwich two cookies with a peppermint buttercream for an elevated treat.
Seasonal Adaptations
These are naturally festive for winter: swap red for green gel color for a St. Patrick’s or Christmas variant, or leave plain for Valentine’s Day with heart-shaped cutters. In summer, omit peppermint and add lemon zest with yellow coloring for a citrus swirl. Small tweaks like crushed candy cane on top after baking can add texture and more pronounced mint flavor.
Meal Prep Tips
Portion the dough into individually wrapped logs and freeze; thaw in the fridge overnight and slice fresh for baking. This saves time on busy mornings or last-minute hosting. Use a cookie scoop and portion the dough before chilling if you prefer drop cookies — they’ll be more rustic but still delicious.
Success Stories
One holiday season I packaged dozens of these for neighbors and added a small note — they were gone by the next morning. A colleague told me they reminded them of childhood candy canes, and another used the dough logs to teach their kids measuring and kneading. Those memories are why I keep this recipe in rotation.
These cookies are meant to be shared, adapted, and loved — pull out the ingredients, invite someone to help roll the log, and enjoy the ritual as much as the result.
Pro Tips
Chill the dough at least 1 hour to prevent spreading and to keep the swirl clean.
Use gel food coloring to avoid thinning the dough and to get a vivid red hue.
Freeze dough logs wrapped tightly for up to 3 months and slice from frozen for fresh cookies.
Roll the log tightly in plastic wrap to minimize air pockets and maintain shape when slicing.
This nourishing peppermint swirl sugar cookies recipe is sure to be a staple in your kitchen. Enjoy every moist, high protein slice — it is perfect for breakfast or as a wholesome snack any time.
Tags
Peppermint Swirl Sugar Cookies
This Peppermint Swirl Sugar Cookies recipe makes perfectly juicy, tender, and flavorful steak every time! Serve with potatoes and a side salad for an unforgettable dinner in under 30 minutes.
Ingredients
Cookie Dough
Coating
Instructions
Cream butter and sugar
In a large bowl, cream 1 cup room-temperature unsalted butter with 1 3/4 cups sugar until light and airy, 3–4 minutes. Add 1 large egg and 1 egg yolk, then the extracts and mix until smooth.
Mix dry ingredients and combine
Whisk 2 1/2 cups flour, 1 tablespoon cornstarch, 1 teaspoon salt, and 1/2 teaspoon baking soda. Add to butter mixture in thirds and mix on low until just combined to avoid gluten development.
Color half the dough
Divide dough in half. Add red gel color to one half and knead until color is even. Use small amounts; color deepens as it rests.
Form and chill the log
Pat each half into 8 x 6-inch rectangles, stack, and roll into a tight 2-inch log using plastic wrap. Chill at least 1 hour to firm the butter.
Coat, slice, and bake
Roll chilled log in 1 cup sanding sugar, slice into 1/4–3/8-inch rounds, arrange on parchment-lined sheets, and bake at 350°F for 10–12 minutes until edges are set.
Last Step: Please leave a rating and comment letting us know how you liked this recipe! This helps our business to thrive and continue providing free, high-quality recipes for you.
Nutrition
Did You Make This?
Leave a comment & rating below or tag
@royalrecipe on social media!
Categories:
You might also like...

5-Minute Air Fryer Roasted Garlic Magic That Wows
Learn how a 5-minute prep transforms a whole garlic bulb into silky, caramelized cloves in the air fryer. Perfect as a spread, mix-in, or flavor booster that elevates weeknight meals and party plates.

Air-Fried Pizza Rolls
Golden, melty pizza rolls made in the air fryer—crispy outside, gooey inside, ready in under 20 minutes. Perfect for snacks, parties, or quick dinners.

Air-Fried Rice Paper Noodle Rolls
Crispy, light rolls filled with vermicelli, tofu or shrimp, and crisp vegetables—air-fried for a healthier crunch and quick prep.
Did You Make This?
Leave a comment & rating below or tag @royalrecipe on social media!
Rate This Recipe
Share This Recipe
Enjoyed this recipe? Share it with friends and family, and don't forget to leave a review!
Comments (1)
This recipe looks amazing! Can't wait to try it.
Comments are stored locally in your browser. Server comments are displayed alongside your local comments.

Hi, I'm Riley!
What's Popular

30-Minute Meals!
Join to receive our email series which contains a round-up of some of our quick and easy family favorite recipes.